Expressions in MAPublisher

From time to time I need to edit attributes in the MAPublisher MAP Attributes table. Typically this is for formatting the names of features before generating labels, but not always. Often I will figure something out, do the thing, move on, and then kick myself 6 months or 3 years down the road when I have to figure the same thing out all over again. I’m going to write them down here and maybe I won’t have to look them up in the future! And maybe it will help someone else.

Append a string if another string doesn’t already exist

I was working with the WPDA dataset and labeling a subset of the polygons. In this case I wanted to label all of the National Parks. Some of the values in the NAME field had “National Park” somewhere in the name, sometimes at the beginning, sometimes at the end.

Some values have “National Park”, others don’t

So, we need an expression that looks to see if the string “National” exists. If it does, leave the NAME value alone, if it doesn’t, then append “National Park” to the end of the existing value.

IF(CONTAINS(NAME,"National"),NAME,NAME & " " & "National Park")

This expression says:

(1) If the value in NAME contains “National”, (2) then replace with NAME (ie-leave it alone., (3) if it doesn’t contain “National”, then replace the value with the existing NAME value and append the string “National Park”.

Apply the expression via the “Apply Expression” option in the flyout menu of the MAP Attributes table:

And the features in question have the correct string, “National Park”, applied to them:

GNIS-Bézier Project Overview

Why?

The GNIS (Geographic Names Information System) is the authoritative* source of information for place names in the United States. It is a fantastic dataset and despite the fact that there seems to be no reasonable way to get errors fixed–namely grossly misplaced peaks and elevation values–it has proven to be a valuable resource for cartographers. All of the features in the GNIS dataset are point features even if they represent features that are distinctly linear.

One of the things that I love about the original USGS topo 1:24k maps and I lament about the new US Topo products is the lack of feature labels on bézier curves that are now printed as straight block labels instead. I know that there are funding issues, usability issues, etc., but nevertheless, I hate to see this art fade away. For smaller features this isn’t quite as much of an issue, but for larger features like mountain ranges, a single point label on a particular quad is poor at best and quite misleading in my opinion.

Railroad Canyon label from the original quad map versus US topo on the right.
Long mountain ranges rendered on a bézier curve multiple times to accurately depict the feature (left) versus a single point text label to label the whole range (right).

SO! What are we as enterprising cartographers to do to resurrect these great labels and use them for our modern cartographic work? Well, that’s what this project is all about.

The Project

This project aims to tap into the skills, time, and expertise of the cartographic community to build a rich, multi-scale dataset of these linear features. Together we can all work on a particular part of the country and then combine our efforts into a single dataset of linear feature labels. It carries an open source license and will be available in the public domain for all to use.

I’ve downloaded the GNIS point dataset and isolated the feature types that I think would benefit from being represented as a linear feature instead of a point feature. Mountain ranges are the obvious example, but other feature types including valleys, canyons, plains, and gulches are included as well. I’ve converted these selected point features into linear features and retained all of the attributes.

The GNIS feature types included in the GNIS-Bézier project
A GNIS-bézier feature for the Crazy Mountains with attached attributes in Adobe Illustrator with MAPublisher.

Help!

If you’ve made it this far, maybe you are the type of person that wants to contribute to the GNIS-Bézier project. Great! Let’s make this dataset together and make it free for everyone so we can all have better maps in our lives for years to come!

Step 1. Choose an Area

The first step to contributing to the project is to choose an area to work on. I’ve broken the country up into blocks that will allow for a ~360 square kilometer area to be worked on at a time. These constraints are based on the maximum artboard size that Adobe Illustrator supports when this area is displayed at ~1:50,000. Use the map below to identify an unclaimed block (click to enlarge). Any of the blocks below that are NOT filled with blue are unclaimed and up for grabs. Send me an email to jamierob @ gmail dot com to claim one. The Video below will help explain the data behind the project and choosing a piece of the country for you to work on.

In progress map: Blue=taken, Yellow=available. Updated 10/04/2020
Project Overview

Step 2. Download the data for your block

After you have your block, it will take me a little while to prep the documents for you. I have a semi-automated procedure that stitches together all of the original quad maps, de-collars and re-projects them, and then strips out a lot of the colors except for the relevant ones to placing the labels. The topo images and the GNIS-Bézier features are then put into an Adobe Illustrator document and ready to go. Once that is done I’ll post the files to the github project page and you can either download it or check it out. Don’t let a lack of git knowledge keep you from pitching in! Here is the repository if you want to check out the work so far.

Step 3: Edit the features

Once you get the features from me, you’re ready to get your hands dirty and move some lines. You’ll need basic knowledge of Adobe Illustrator, file management, and an attention to detail. There are some custom path scripts that really help to refine the bézier curves. An extension for Adobe Illustrator called MAPublisher is also required, but if you don’t have one–that’s ok–you can get a 14-day trial from Avenza and hopefully that should be sufficient for you to complete your block. The video below explains the procedure for downloading and editing your block of data in Adobe Illustrator. The basic steps to remember are:

  1. Edit the two nodes to make each line feature match the shape of the physical feature in question. Add new nodes as necessary but only if needed.
  2. Attributes – When the line is finished, update the ‘workstatus’ attribute for the feature as follows:
    1. x – The edit is complete and no other work is needed. It falls completely within the block being edited.
    2. q – you have a question about the feature. Someone else should take a look at it.
    3. e – The feature goes off of the edge of the block you are editing. When this feature is merged into the nation-wide document, this will need to be edited/fixed.
    4. Delete – If you think that the feature is just too small or silly to warrant an actual linear feature label, just delete the feature.
  3. Remember: These are very small illustrator files from a size perspective because they do not have embedded images or saved with PDF compatibility. If you try to save it with PDF compatibility checked or embed the images, it will probably choke.
Editing and Contributing

Step 4: Submit your work back to the project

When you’re finished editing your block, either send the .ai file back to me or make a pull request and commit it via git. I’ll combine it into the full usa .ai document and we’ll slowly build up the dataset for the whole country. If/when all of the blocks are completed, we’ll have a single .ai document with bézier lines, with attributes for the whole country. We can assign map scale to features based on the line length and/or if the label text will fit on the line at a given scale. I haven’t quite sorted that part out yet. Finally, the dataset can then be exported out to other geodata formats so it can be used in other applications. The reason for starting in Illustrator with MAPublisher is to have the clean, bézier features first because when the features are exported (likely to shapefile), nodes will be added along the curves.

Thank you for reading and please consider working on a block if you’re interested! If you have any questions please post them below or send me an email.

*authoritative from a European colonization standpoint. The GNIS dataset contains place names from after Europeans arrived on Turtle Island and created names for these features. Many indigenous place names are not represented and some current place names are racist. I fully support efforts to rename these features to provide long overdue respect and recognition of the original names that were attached to these features.

Custom Scripts and Shortcuts for Cartography

Back in 2017 I gave a presentation about a set of custom scripts and shortcuts for enhanced productivity in Adobe Illustrator. They have proven indispensable for me and my cartographic work. If you want to spend less time in menus and also have some special tools to help you make maps, check out the video below. There are also installation videos for Mac and Windows. I’ve updated the shortcuts and scripts for Illustrator 2020 on Mac and Windows. Download the scripts and shortcuts here.

Install Scripts/Shortcuts on Win/Mac, Illustrator 2020

Back in 2017, I gave a presentation at NACIS about a selection of scripts and shortcuts for enhanced productivity when making maps in Adobe Illustrator. I’ve updated the repository and the shortcuts for Illustrator 2020. Below are two videos to show the process of setting them on Windows 10 and MacOS Mojave.

Git Repository and a presentation on the scripts themselves: http://cairn.pw/nacis2020

Windows 10/Illustrator 2020

MacOS Mojave/Illustrator 2020

Illustrator Character Style Batch Text Regex Replace Script

Disclaimer: This script is really niche, but has come in handy when dealing with lots of text objects that contain labels driven by multiple attribute fields. Ok, into the weeds:

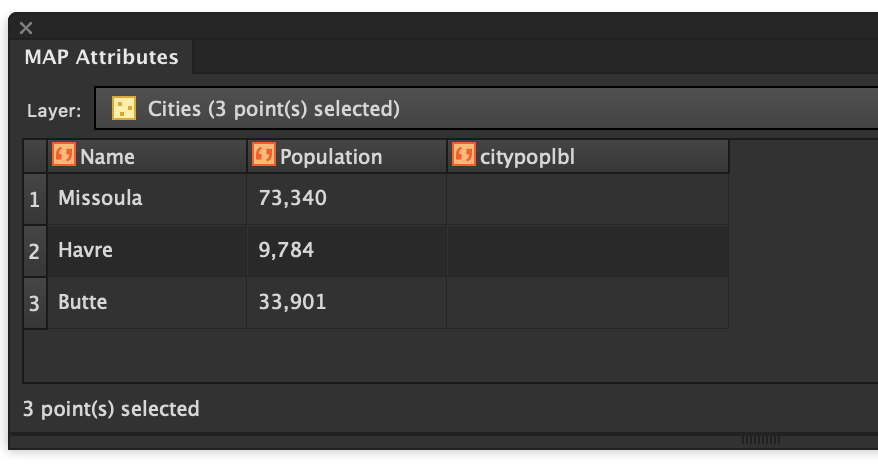
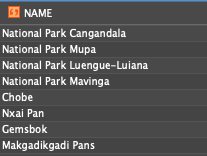
1. Labeling with multiple attribute fields. Sometimes I’ll need to label a set of hundreds of points with multiple attribute fields. MAPublisher can do this easily enough, but I often don’t want them to be broken up into separate text objects. Aligning and moving them around accurately can be quite a chore. Luckily, it’s easy enough to concatenate attributes together into a new field and then label the points with that field. Other text can be added in as well. For example, to concatenate The Name field and Population field together into a newly created citypoplbl field, along with some other text (more on this later), we could do the following:

(Name)& "$Pop.$" &(Population)
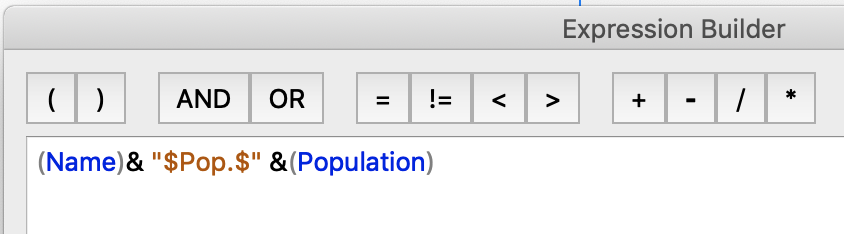
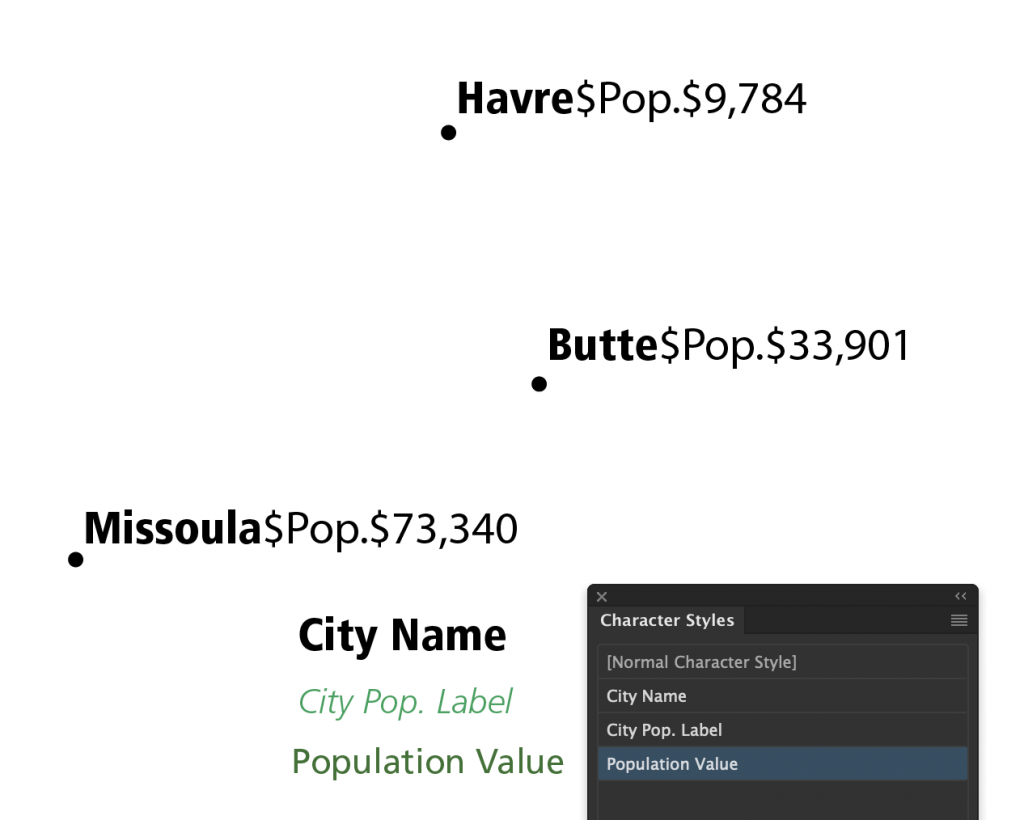
to get:

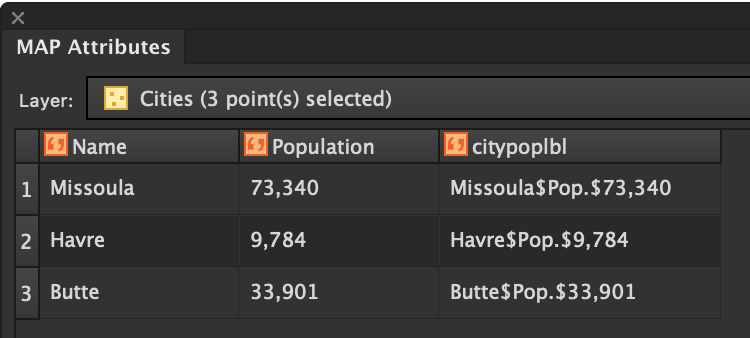
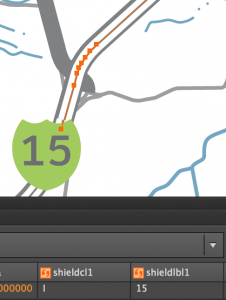
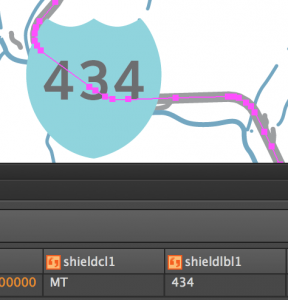
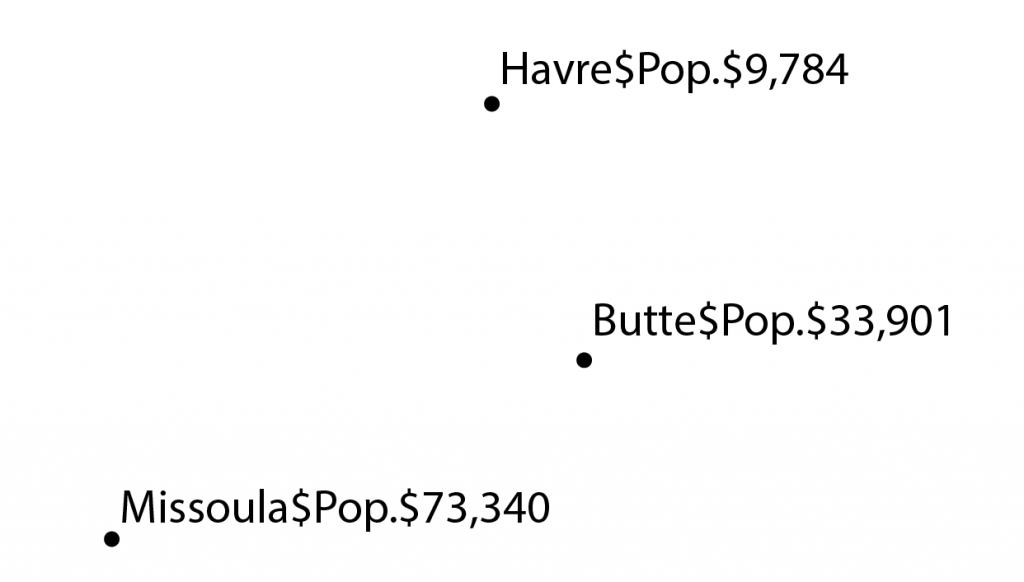
Now we can use MAPublisher to label with the citypoplbl field:

2. Batch mode? This example with only three points would be simple enough to manually adjust character styles to each bit of text that we want–but what if this was a map with 2,000 labels? The tedium would be untenable, and i’d likely revert to separate point text objects for each attribute so they could be styled individually, but then I’d be dealing with alignment issues.. So, what if there was a way to target parts of the point text object string and apply a character style to just that part? Well, dear map nerd, your script has arrived. Read on!

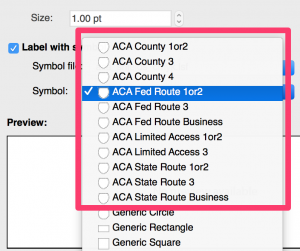
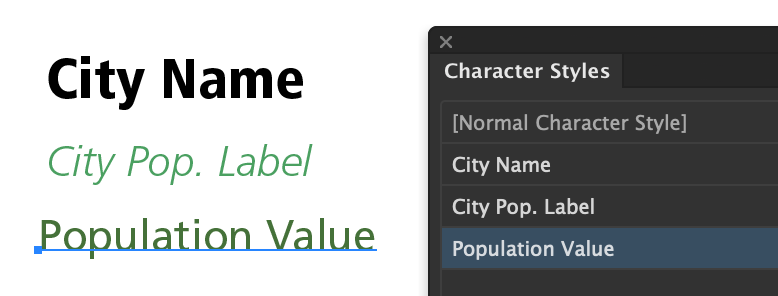
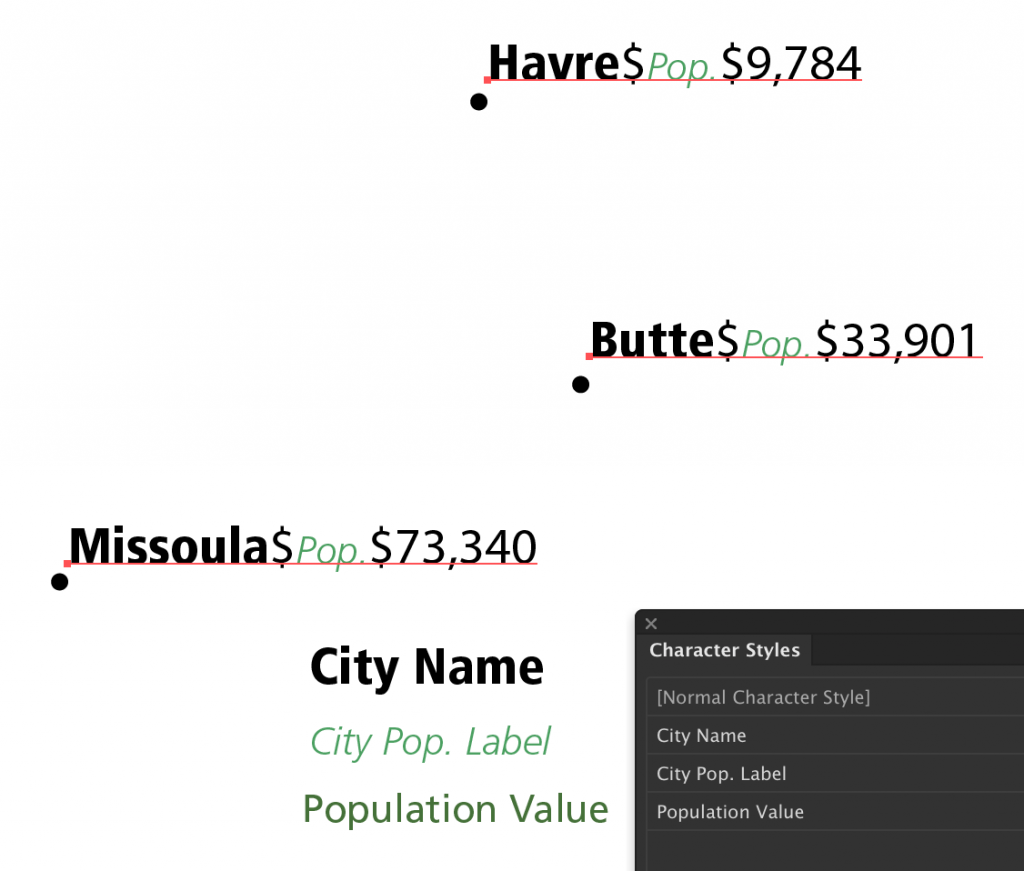
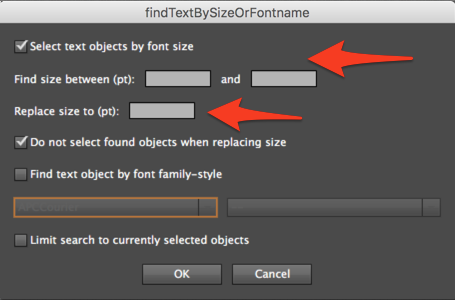
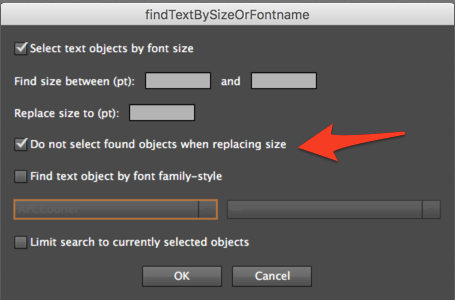
3. Using the Batch Regex Character Style replace script. Once you get the apply_Style_With_RegExp.jsx script from the git repo, put it in a location that is accessible, or in the .../Scripts/ folder of your illustrator installation. Make some Character styles that you want to use:

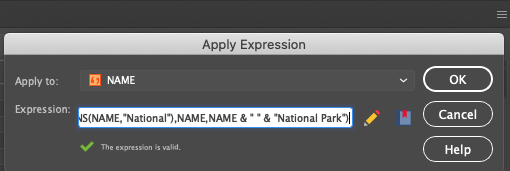
Select the text objects that you want to target with the script and run it. You’ll be prompted for a regular expression to search with, and a dropdown list of the document Character Styles to apply one to the text found with the regex pattern. This will work with any regular expression, but to make this easy to target, we’ve put ‘$’ into our label string so we can easily target each part of the label string.

Regular expressions are so powerful. I find them totally infuriating sometimes, but when they work, they can save you heaps of time with data processing and now with styling maps as well. regex101.com is an invaluable tool for testing and learning regular expressions.

So, first we want to style all of the city names with the City Name Character Style. We’ll use ‘^’ to search from the start of the string, ‘\w’ to look for any word character, and then ‘*’ to find as many word characters as we can. Since we have a non-word character, ‘$’, after the City Name, the search will find all of the city names and nothing else:

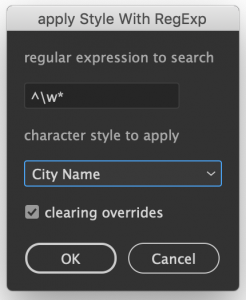
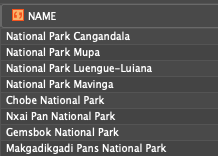
We see that we’ve applied the ‘City Name’ character style to those parts of the string:

Now to style the ‘Pop.’ bit. We could use a really fancy regular expression to find all characters between ‘$’ and ‘$’, but since we know they are all ‘Pop.’ in this case, we can just search for that:
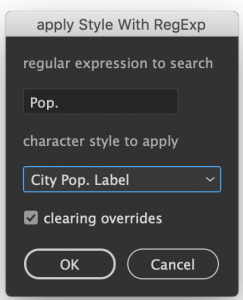
success!

Now for the population value. This regular expression is pretty ugly and I’m sure it could be done more efficiently, but it works. In hindsight, using ‘$’ for the ‘catch’ character is not ideal because it also means ‘end of string’ in regex.

\.\$(.*)$
\. #literally match a period
\$ #literally match a dollar sign symbol
(.*) # '.*' #any number of any characters # '()' used to make this the pattern to actually match
$ #target the end of the string

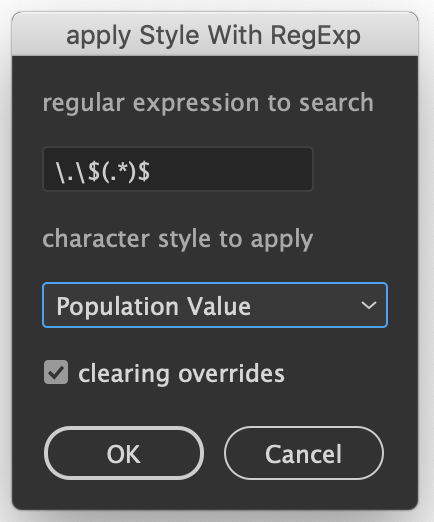
And now we’ve got all three parts of the label styled with our three separate character styles:

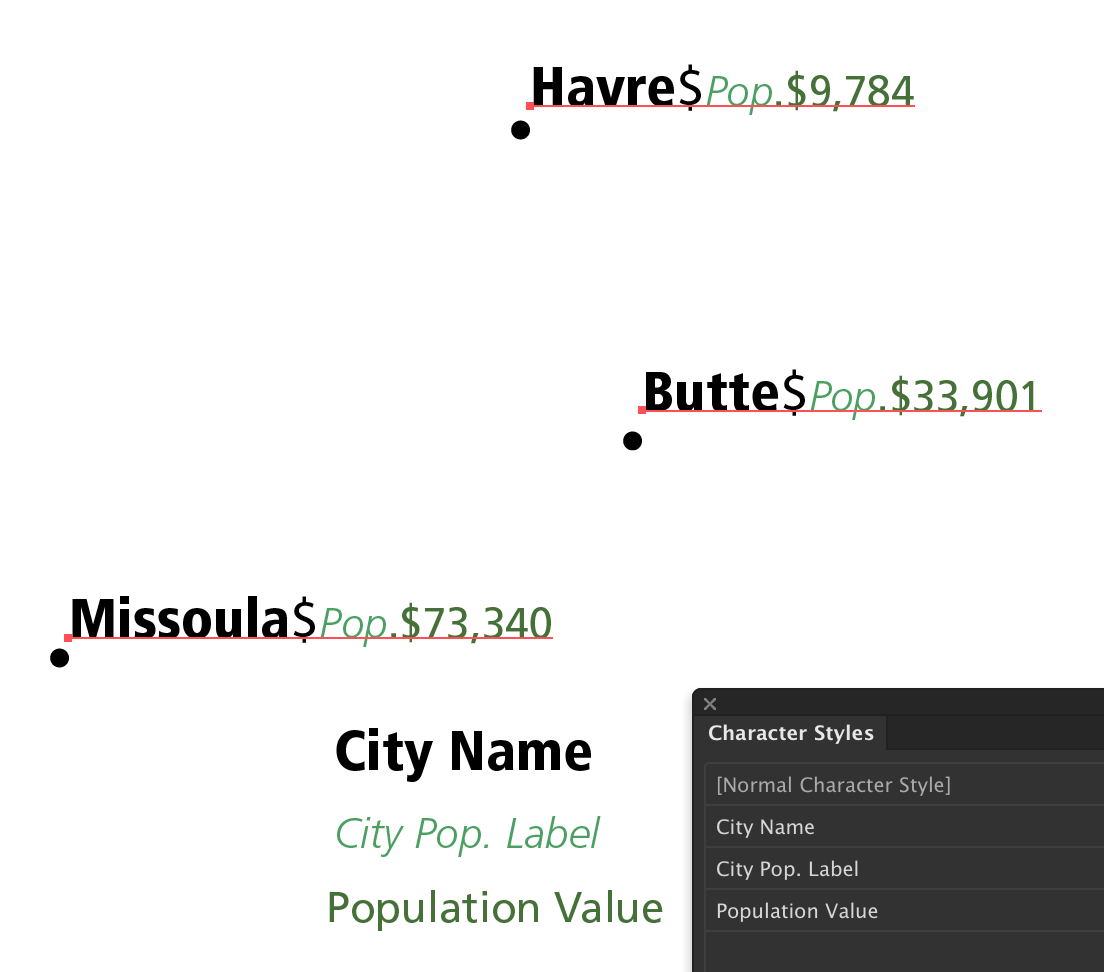
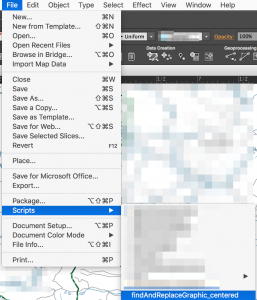
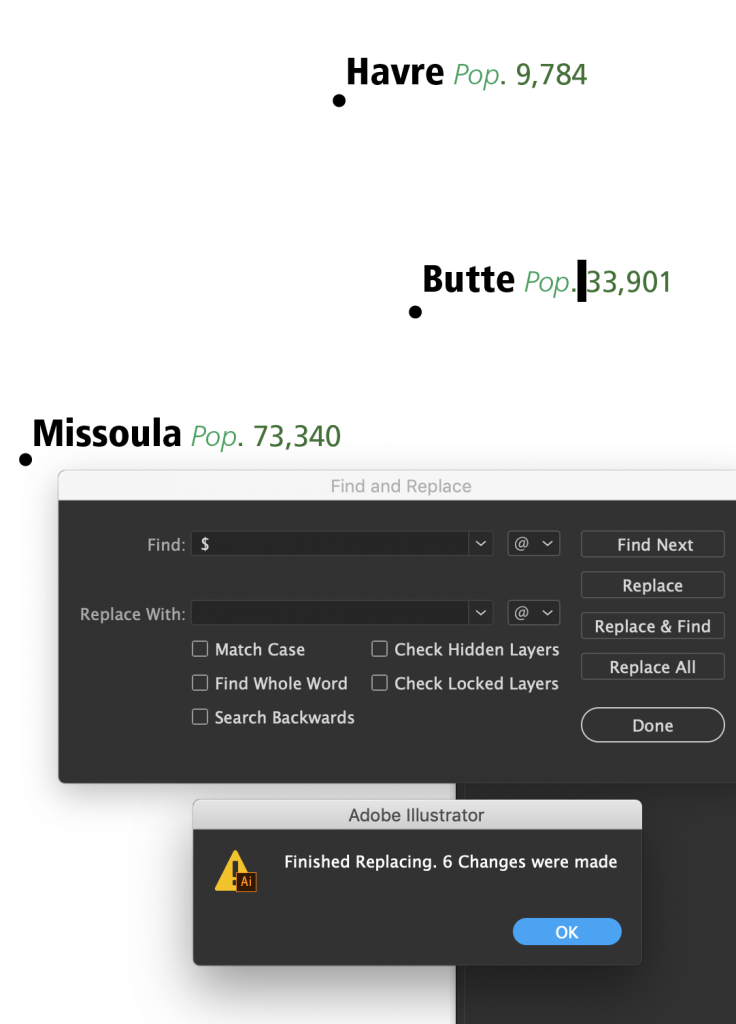
4. Replace the dollar signs. Finally, use the standard Illustrator Find and Replace tool to replace the ‘$’ symbols with normal spaces:


Map on! Once again, many thanks to the talented and generous @shspage_en for working on this script with me.

TLDR and scrolled to the bottom–link to the script

Text Selection Wizard for Illustrator

As a Print Cartographer, I use Adobe Illustrator for a huge part of my work. I find myself feeling very limited by the native functionality to select and manage the huge amounts of complex text that I have on my maps. To solve this, I’ve worked with the amazingly talented Hiroyiki Sato, @shspage_en, to create a text selection wizard that makes my work so much easier and productive. Some of the features are shown below:

  1. Select point and path text with a given font size or a range of font sizes. Leave the second box blank if you don’t want to select a range. Optionally choose to change the text objects that are found to a new font size:
  2. Option: ‘Do not select found objects when replacing size’ I’ve used this script on giant maps with ~7,000 text objects. Since this is javascript and not native C, it can take a long time to process all of the objects, but this script perseveres and does the job! Use this option to make the script work less and not re-select all of the objects after it has modified the size.
  3. Select point and path text objects by Font Family and/or Font Style. This is an amazing way to modify the text objects on your map to a new font family or style. Have you ever made a whole map with all of the creek labels being the ‘Light Italic’ font style and wanted to see what it would like with all of the text objects being ‘Italic’ instead? I find that this is not easy because the objects I want to change are mixed with other styles in the layer, so it becomes cumbersome to filter them. Use this script to make that happen without having to tediously select them individually or separate them out into their own layer. Leave the second box empty if you want to select an entire font family and not a specific style.

Give this script a shot along with many other useful scripts for cartography in Illustrator at my git repo.


Replacing text shields with symbols in MAPublisher LabelPro

Replace text glyph shields with your own Illustrator symbols en-masse! What is this magic? We’ll use a custom shields file, a selection trick, and a script to make it happen. If this is interesting to you, read on..

When I make maps with Avenza MAPublisher, one of the common things that I need to do is place shield labels on roads. This is possible with an extra extension to the base MAPublisher license called MAP LabelPro. It’s worth noting that this requires an additional up-front cost and annual maintenance fee.

In the MAP LabelPro setup dialogue, you can choose from sets of pre-built shields to use:

These are nice to have but have some limitations. They are actually generated from a bundled .ttf font file, and the shield objects themselves are hard to deal with because of this. Note the shield underlined like a text object and the Label-EZSymbols font associated with it:

I need a lot more control over the style of the shields (as I expect most cartographers do), so the options are to: (1) make your own custom ‘shields’ .ttf font files (export your .ai shield art to .svg and turn it into a .ttf file) or (2) find a way to replace the ones that are placed with MAP LabelPro with your own normal .ai shield symbols. I attempted option 1, but it turned into a ton of fiddly conversion work, time wasted, and the end product was still a text object that I didn’t really want in the first place. So, option 2 is what we’ll work out below.

  1. Make a custom .lsf file for your shields. Navigate to your MAPublisher prefs (Illustrator>MAPublisher Preferences). Click on MAP LabelPro and see where your rules, styles, and symbols are at. By default this is set to:
    /Applications/Avenza/MAPublisher 9.9/MAPublisher Plug-in/LabelPro/Symbols/ I highly recommend setting this in a custom location on your disk. Then you can keep track of everything, make it a git repo if you want to, and not lose it all when upgrading MAPublisher versions.

    Make a copy of the .lsf file that best matches your use case. I make print maps, so ‘generic_shields_cmyk.lsf’ will work for me.
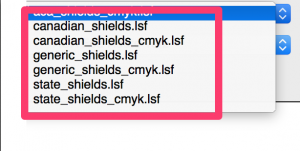
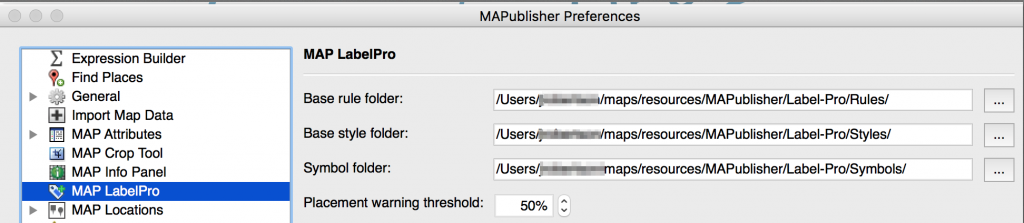
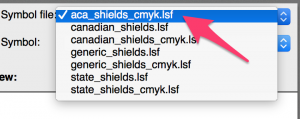
Name it something that you will recognize. I’ll name mine ‘aca_shields_cmyk.lsf’

  2. Edit the .lsf file with custom shields.  Crack open your new .lsf file in your favorite text editor. This file describes the properties of each symbol. Let’s look at one below:

    1. The first three lines are the header info. Leave everything as-is. The only thing to take into account here is that as you build your .lsf file with different symbol sets, you need to set NumSymbols=XX to the number of symbols in your file.
    2. Each block of code after that represents the properties of a single shield. For the example above:
      1. Line 5: the number of the symbol in the file. sequential from top to bottom.
      2. Line 6: the link to the .ttf file with the shield text objects. leave this alone.
      3. Line 7: the link to the shield .png file. this is just the display icon in the MAP Label Pro dialogue. leave this alone.
      4. Line 8: the name of the shield that will appear in the labelPro dialogue
      5. Line 9: The number of glyphs that make up the shield. it’s important that this matches the glyph defs coming next
      6. Line 10-11: the glyph ids coming from the .ttf file in windows 1251 character encoding (ie-“1=50”) followed by C,M,Y,K values for the glyph
      7. Line 12: the alignment of the text on top of the shield. (left,bottom,top,right)
      8. That is kind of a mess, but not to worry, we are going to keep it simple. Remember that these text shields are just a method to get objects into our illustrator document. we’re going to replace them with our own illustrator symbols. All we really care about is the SymbolName, NumGlyphs, and CMYK value.So, copy one of those blocks and edit it:

        1. Set Your SymbolName to represent one of you .ai shield symbols, ‘State Route Business’ in this case.
        2. Set the NumGlyphs to 1. this is important because we want to keep the replacement simple and a single glyph is easy to target.
        3. Set Glyph to “1=50 CMYK *CMYK values*”. This example represents a grayish blue 41,0,12,35. We’ll use this color to represent all shields on our map that we want to use our State Highway Business Route shield for. Yours will likely be different. This is important because we will use this color as a target later on during the replacement. I’m not sure why there is a leading ‘0.” in front of the CMYK value–just roll with it.

        4. You’ll repeat this process for each shield that you want to be able to place with LabelPro and then replace with one of your own symbols. Remember to number the symbol entries sequentially, and then edit the header with the number of symbol entries that you have in the file.
    3. Setup LabelPro with your shields. Open up a MAPublisher document with some road data that you want to label with. In a perfect world (haha) you’ll have an attribute representing the shield type (State/Federal/County, etc) and another with the number of the route. Click the LabelPro button, add your line layers, setup your attributes and sql, and then in the “Label With Symbol” section:
      1. You should see your new .lsf file represented:

      2. And all of the shield entries that you made in the file:

    4. Label! Run your LabelPro rules and check out your output. Remember that the goal here is to have a shield placed with a single glyph, with a fill color representing a certain class of shield that we want to replace with our own shields. For example, below I’ve used this green color to represent a shield class of “I” (interstate), and a value that is 2 digits long:

      I’ve used this blue color to represent a “MT” (or any State Route), and a value is 3 digits long:

    5. Setup Replacement Key. Now you have a map full of strangely colored shields. Make a new layer that will serve as the replacement ‘key’. This will be something that you want to keep around to copy/paste into new documents or integrate into your template files. It should contain an instance of the text symbol (from your recently placed shields) and the corresponding illustrator symbol. Mine looks like this. It’s grouped by route type and the number of digits in the label string:

    6. Download and install find/replace script. The great and generous cartographer, Nathaniel Kelso, wrote some illustrator scripts way back in the day and graciously shared them with the world. We’ll use one of them to do this replacement. Download his scripts git repo here. The one we’re interested in is the “findAndReplaceGraphic_centered.jsx” file. Install this file (or all of them) into your Scripts Folder. This is something like: “/Applications/Adobe Illustrator CS6/Presets.localized/en_US/Scripts” Yours might vary slightly. Once it is there, it should be available in your File>Scripts menu.
    7. Do the Replacement Already! Ok, finally, let’s do this. You will have a MAP Text Layer containing all of the text shields that were placed by LabelPro. Drag the layer that represents your replacement key in a layer above the shield layer. It’s ok that the text is grouped with the shield object–This script is smart enough to work through the groups. It should look something like this:

      Direct-Select one of the shields in your replacement template layer. The key here is to select only the text symbol object (and the corresponding fill color). With that selected, Go: Select>Same>Fill Color:

      All of the shields across the map with that fill color (and road designation) should be selected. It doesn’t matter if they are in multiple layers or MAP Text suppression layers:

    8. Now, Shift+click (to add to the current selection) the illustrator symbol that represents the class of shields you currently have selected. This symbol should be ABOVE the text symbol instances in the Replacement template layer. Go: File>Scripts>findandReplaceGraphic_centered

    9. Done! The script may chug a little bit, but just give it time. I’ve used it on huge maps with hundreds of replacements and it always works if you just let it be. If you look at the shield objects in the layer list, you’ll see that the illustrator symbol has replaced the text symbol inside the group with the text string:

      Repeat for all the other shield colors/classes, and you should have a map with your own illustrator symbols ready to work with: