Back in 2017 I gave a presentation about a set of custom scripts and shortcuts for enhanced productivity in Adobe Illustrator. They have proven indispensable for me and my cartographic work. If you want to spend less time in menus and also have some special tools to help you make maps, check out the video below. There are also installation videos for Mac and Windows. I’ve updated the shortcuts and scripts for Illustrator 2020 on Mac and Windows. Download the scripts and shortcuts here.
Tag / Illustrator
Install Scripts/Shortcuts on Win/Mac, Illustrator 2020
Back in 2017, I gave a presentation at NACIS about a selection of scripts and shortcuts for enhanced productivity when making maps in Adobe Illustrator. I’ve updated the repository and the shortcuts for Illustrator 2020. Below are two videos to show the process of setting them on Windows 10 and MacOS Mojave.
Git Repository and a presentation on the scripts themselves: http://cairn.pw/nacis2020
Windows 10/Illustrator 2020
MacOS Mojave/Illustrator 2020
Text Selection Wizard for Illustrator
As a Print Cartographer, I use Adobe Illustrator for a huge part of my work. I find myself feeling very limited by the native functionality to select and manage the huge amounts of complex text that I have on my maps. To solve this, I’ve worked with the amazingly talented Hiroyiki Sato, @shspage_en, to create a text selection wizard that makes my work so much easier and productive. Some of the features are shown below:
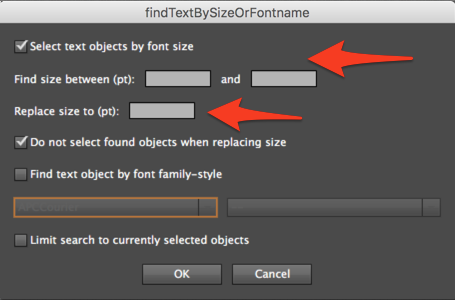
- Select point and path text with a given font size or a range of font sizes. Leave the second box blank if you don’t want to select a range. Optionally choose to change the text objects that are found to a new font size:
-
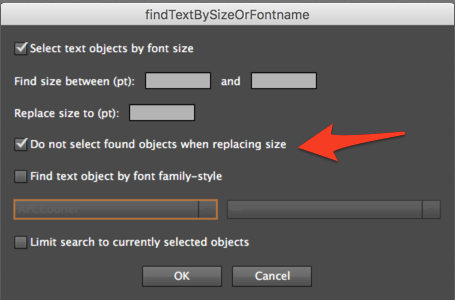
- Option: ‘Do not select found objects when replacing size’ I’ve used this script on giant maps with ~7,000 text objects. Since this is javascript and not native C, it can take a long time to process all of the objects, but this script perseveres and does the job! Use this option to make the script work less and not re-select all of the objects after it has modified the size.
-
- Select point and path text objects by Font Family and/or Font Style. This is an amazing way to modify the text objects on your map to a new font family or style. Have you ever made a whole map with all of the creek labels being the ‘Light Italic’ font style and wanted to see what it would like with all of the text objects being ‘Italic’ instead? I find that this is not easy because the objects I want to change are mixed with other styles in the layer, so it becomes cumbersome to filter them. Use this script to make that happen without having to tediously select them individually or separate them out into their own layer. Leave the second box empty if you want to select an entire font family and not a specific style.
-

Give this script a shot along with many other useful scripts for cartography in Illustrator at my git repo.
Loading Natural Earth data into PostGIS for Illustrator/MAPublisher
Natural Earth Data
The Natural Earth datasets are an incredible resource. If you’re a cartographer you probably already know about it, and if not, you should definitely check it out. It’s a project spearheaded by some fantastic folks affiliated with NACIS. NACIS is a great organization that does so much for the cartographic community–check them out! I use Natural Earth Data a lot so it made sense for me to get all of the data into a format where I could import/crop any dataset into my Illustrator/MAPublisher document without having to even touch a GIS. update: Version 4 just got released on 10.30.2017 and it’s better than ever!
MAPublisher Data Import Spatial Filters
One of the things that I’ve come to really appreciate when making maps with Illustrator/MAPublisher is the ability to import and crop data from a large dataset automatically via the MAPublisher advanced data import spatial filters. Being able to import data directly into your map document from large datasets (like OSM, NHD, GNIS, NaturalEarthData, etc.) without having to worry about clipping data and futzing with different CRS’s in QGIS is really nice. Prior to MAPublisher 9.8.1, the only data type that supported the spatial filters was File Geodatabase. This is fine if you have ESRI products, but I use GDAL/QGIS, and support for file geodatabases, both with the OpenFileGDB driver or the ESRI FileGDB driver, is sketchy at best. The OpenfileGDB driver is read-only and using the ESRI FileGDB driver seems to crash QGIS a lot–especially in an active edit session on a file geodatabase.. BUT, as of MAPublisher 9.8.1, imports from PostGIS with spatial filters is supported. This is fantastic because PostGIS is well supported with OSS and is extremely scalable.
So, now to get all of that nice data into a PostGIS database. This will explain the procedure I followed to import the entire suite of Natural Earth vector datasets into a single PostGIS database.
-
-
- Install QGIS.
- After downloading and opening the .dmg, you’ll get a volume with Qgis and some dependencies, including GDAL. Install all of them (1-4) in order. If you get an error saying that it can’t be installed because it’s unverified, enable the installation of apps from Anywhere in System Preferences>Security and Privacy.
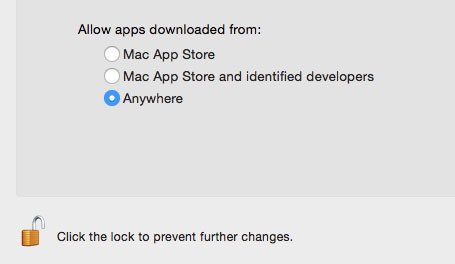
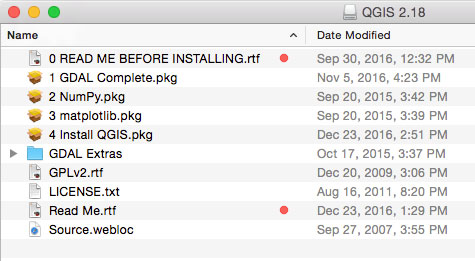
- After downloading and opening the .dmg, you’ll get a volume with Qgis and some dependencies, including GDAL. Install all of them (1-4) in order. If you get an error saying that it can’t be installed because it’s unverified, enable the installation of apps from Anywhere in System Preferences>Security and Privacy.
- Setup GDAL utilities for the command line
- Open up a new terminal window (Applications>Utilities>Terminal.app) or use spotlight, my favorite tool: (cmd+space>type “ter”>Enter).
- Run the following three commands:
-
echo 'export PATH=/Library/Frameworks/GDAL.framework/Programs:$PATH' >> ~/.bash_profile -
source ~/.bash_profile -
gdalinfo --version
-
- You should see the GDAL version returned (2.1.2 in my case). Now you can use GDAL utilities from the command line, and since that line was added to your .bash_profile file, they will be available every time you start your computer.

- Install Postgres.app
- Download the .dmg and run it. Drag the elephant to the Applications folder, start up the app, and click “initialize”. That was easy! Now you have postgres (and PostGIS) installed. The server should be running look something like this:
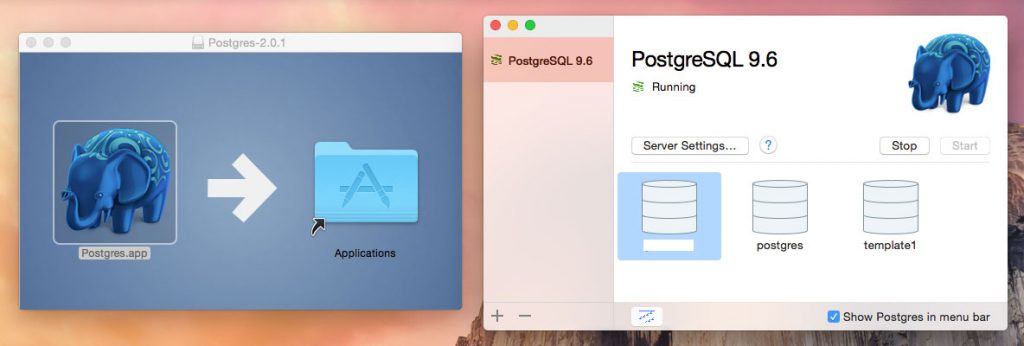
- Download the .dmg and run it. Drag the elephant to the Applications folder, start up the app, and click “initialize”. That was easy! Now you have postgres (and PostGIS) installed. The server should be running look something like this:
- Download the NaturalEarth full vector dataset.
- On the download page, look for the link for ‘Download all vector these as SHP/GeoDB’

- Once you download and extract the .zip file, you should see bunch of folders. Six containing all of the themes broken up by category:
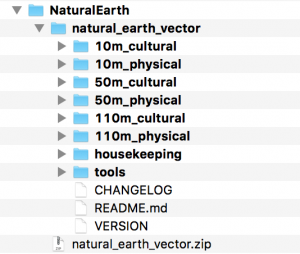
- On the download page, look for the link for ‘Download all vector these as SHP/GeoDB’
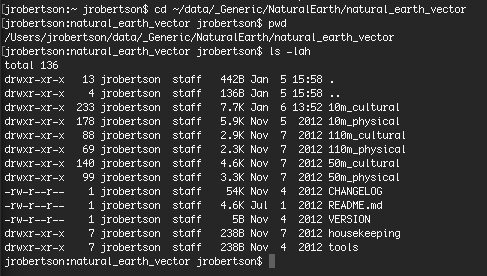
- cd over to the data.
- Fire up a terminal and ‘cd’, or change directory, over to your downloaded data. mine is in my ‘data’ folder in my home directory:
-
cd ~/data/_Generic/NaturalEarth/natural_earth_vector - pwd can be used to echo out your current location, and ls -lah will list the current folder with all the deets:
- Setup the PostGIS database.
- Fire up a psql window by clicking on the elephant in your menu bar>Open Postgres>double-click on any of the default databases:

- At the psql prompt, run the following to setup a new database with PostGIS and some schemas to organize the data with.
CREATE DATABASE naturalearth; \c naturalearth CREATE EXTENSION postgis; CREATE SCHEMA z10m_cultural; CREATE SCHEMA z10m_physical; CREATE SCHEMA z50m_cultural; CREATE SCHEMA z50m_physical; CREATE SCHEMA z110m_cultural; CREATE SCHEMA z110m_physical; CREATE EXTENSION hstore; - Setup DB search paths. This will allow MAPublisher to be able to index the extra schemas for use with the data import spatial filters.
ALTER DATABASE naturalearth SET search_path = z10m_physical, z10m_cultural, z50m_cultural, z50m_physical, z110m_cultural, z110m_physical, public; - That should be it. The database is all ready for the ogr2ogr imports.
- Fire up a psql window by clicking on the elephant in your menu bar>Open Postgres>double-click on any of the default databases:
- Import all .shp’s into PostGIS
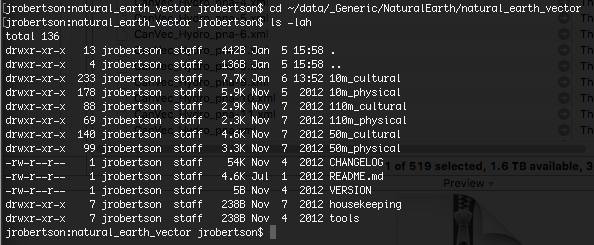
- In a terminal (not the psql one) ‘cd’ over to your shapefiles:
-
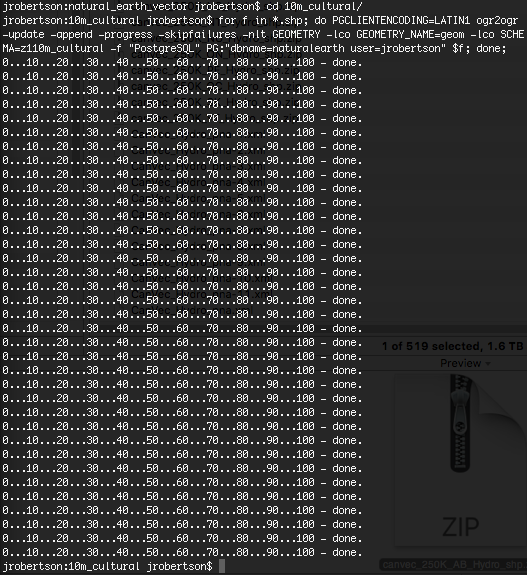
cd ~/data/_Generic/NaturalEarth/natural_earth_vectorList the directory to see what we’ve got. you should see folders for the 6 main categories:
- now, cd into the first one, ’10m_cultural’
cd 10m_cultural/ - Run the ogr2ogr import for all .shp’s in this theme:
for f in *.shp; do PGCLIENTENCODING=LATIN1 ogr2ogr -update -append -progress -skipfailures -nlt GEOMETRY -lco GEOMETRY_NAME=geom -lco SCHEMA=z10m_cultural -lco PRECISION=NO -f "PostgreSQL" PG:"dbname=naturalearth user=username" $f; done;
- So, what are we actually doing here:
for f in *.shp; do #search the folder for all files with .shp extension and do all the rest of this business to them.
PGCLIENTENCODING=LATIN1 #set the encoding to play nice with some of the feature names with special characters. it's still not perfect.
ogr2ogr #invoke GDAL/OGR. gdal for raster, ogr2ogr for vector.
-update -append #append the data to an existing table if preset, not overwrite.
-progress -skipfailures #show a progress bar. if there are problems, keep truckin.
-nlt GEOMETRY
#nlt=new layer type. typically this wouldn’t be necessary as the geometry type would be automatically detected. However, these shapefiles have mixed polyline/multipolyline and polygon/multipolygon geometries in the same .shp. PostGIS will default to “promote-to-multi”, which is usually preferred, but this will result in Illustrator/MAPublisher importing even simple lines and ‘single-ring’ polygons as compound paths. This is annoying when you later need ot break the paths, run join tools on them, etc. SO..specifying “GEOMETRY” will retain the single/multi designation of each feature as it is in the .shp and will be imported correctly into Illustrator/MAPublisher. If you were going to do a bunch of geoprocessing or analysis on this data, this would be no bueno, but since all we’re doing is importing into Illustrator, this is preferred.
-lco GEOMETRY_NAME=geom
#lco=layer creation option. Set the name of the geometry column to ‘geom’. This isn’t usually necessary either, but some versions of MAPublisher have the spatial filters hard coded to only detect the geometry properly if ‘geom’ is the name of the column containing the actual geometry.
-lco SCHEMA=z10m_cultural
#import all of these .shp’s into this schema. This is important to set correctly based on the name of the folder of shapefiles you are in. z10m_cultural in this case. You’ll change this for all six categories of the Natural Earth Data. the ‘z’ is simply because a schema cannot start with a number.
-lco PRECISION=NO
#some of the .shp’s have rounding errors on the fields when importing into PostGIS. Use this to make sure that even features which have these long rounding errors get imported too.
-f "PostgreSQL" PG:"dbname=naturalearth user=username"
#this is the data format that ogr2ogr is writing TO. PostGIS in this case. the dbname, and the username you setup. If you have Postgres running on a port other than 5432 or have a password setup, you’ll need to specify that here too.
$f; done;
#$f is each shapefile as the ‘for’ command loops through the folder, done; is to the way to end the loop.
- Results. After running the command you should see a bunch of progress bars and no errors:
- Run for the 5 other categories.
- After running that command for one of the folders, ‘cd’ back a directory (../) and then into another one of the directories, and run the command again. paying close attention to modify the schema to match the folder that you are in.
cd ../10m_physical
for f in *.shp; do PGCLIENTENCODING=LATIN1 ogr2ogr -update -append -progress -skipfailures -nlt GEOMETRY -lco GEOMETRY_NAME=geom -lco SCHEMA=z10m_physical -lco PRECISION=NO -f "PostgreSQL" PG:"dbname=naturalearth user=username" $f; done;

- After running that command for one of the folders, ‘cd’ back a directory (../) and then into another one of the directories, and run the command again. paying close attention to modify the schema to match the folder that you are in.
- Clean up the database
- Once you’ve done this for all six folders, switch back to your psql terminal and run a vacuum on the database. this will clean up all of the transactions:
VACUUM FULL;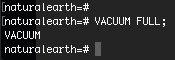
- Once you’ve done this for all six folders, switch back to your psql terminal and run a vacuum on the database. this will clean up all of the transactions:
- Import at will!
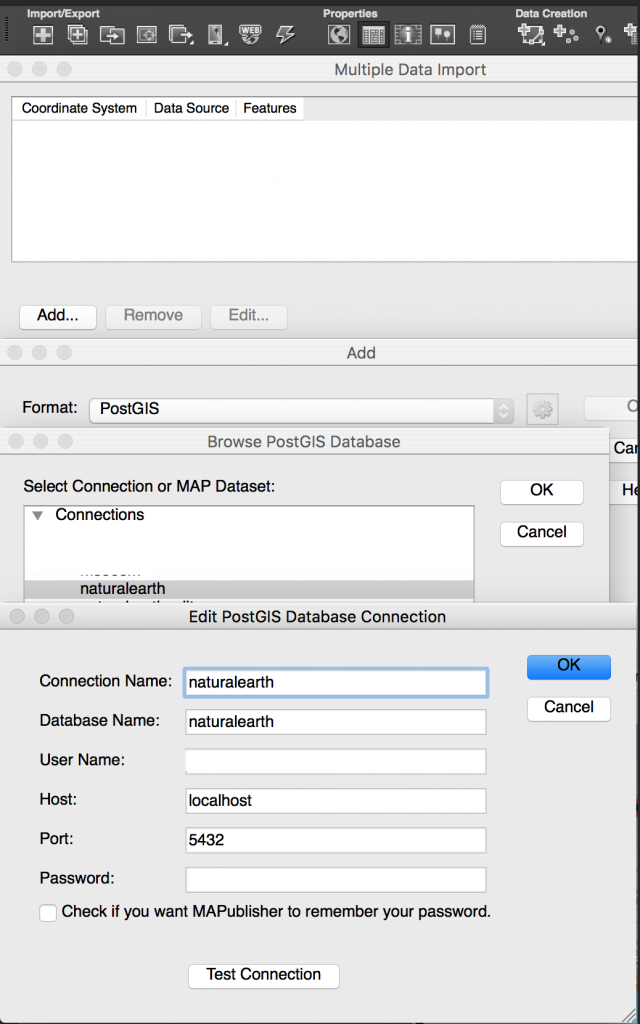
- Once you’ve done all this, you should be able to access this database via Illustrator/MAPublisher. From Illustrator go Advanced Data Import>Add…>PostGIS>New Connection>and enter your connection details:
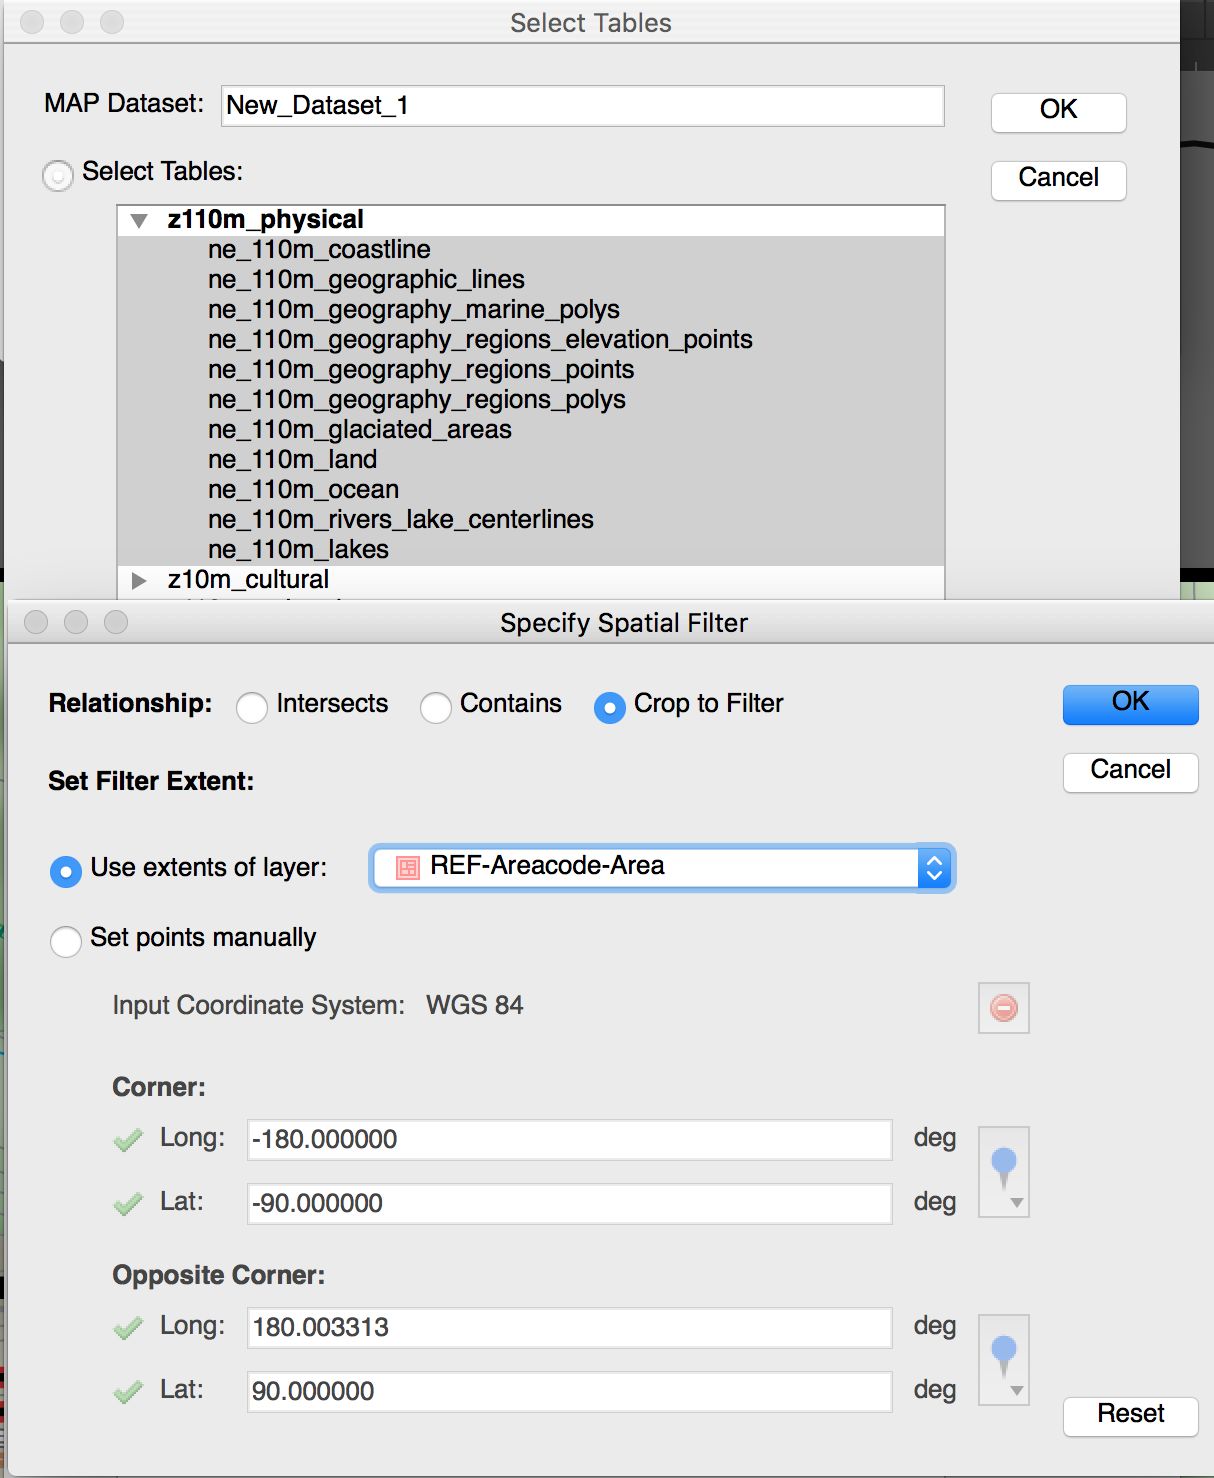
Once connected to the database, you should see all of the tables organized in the schemas you setup:
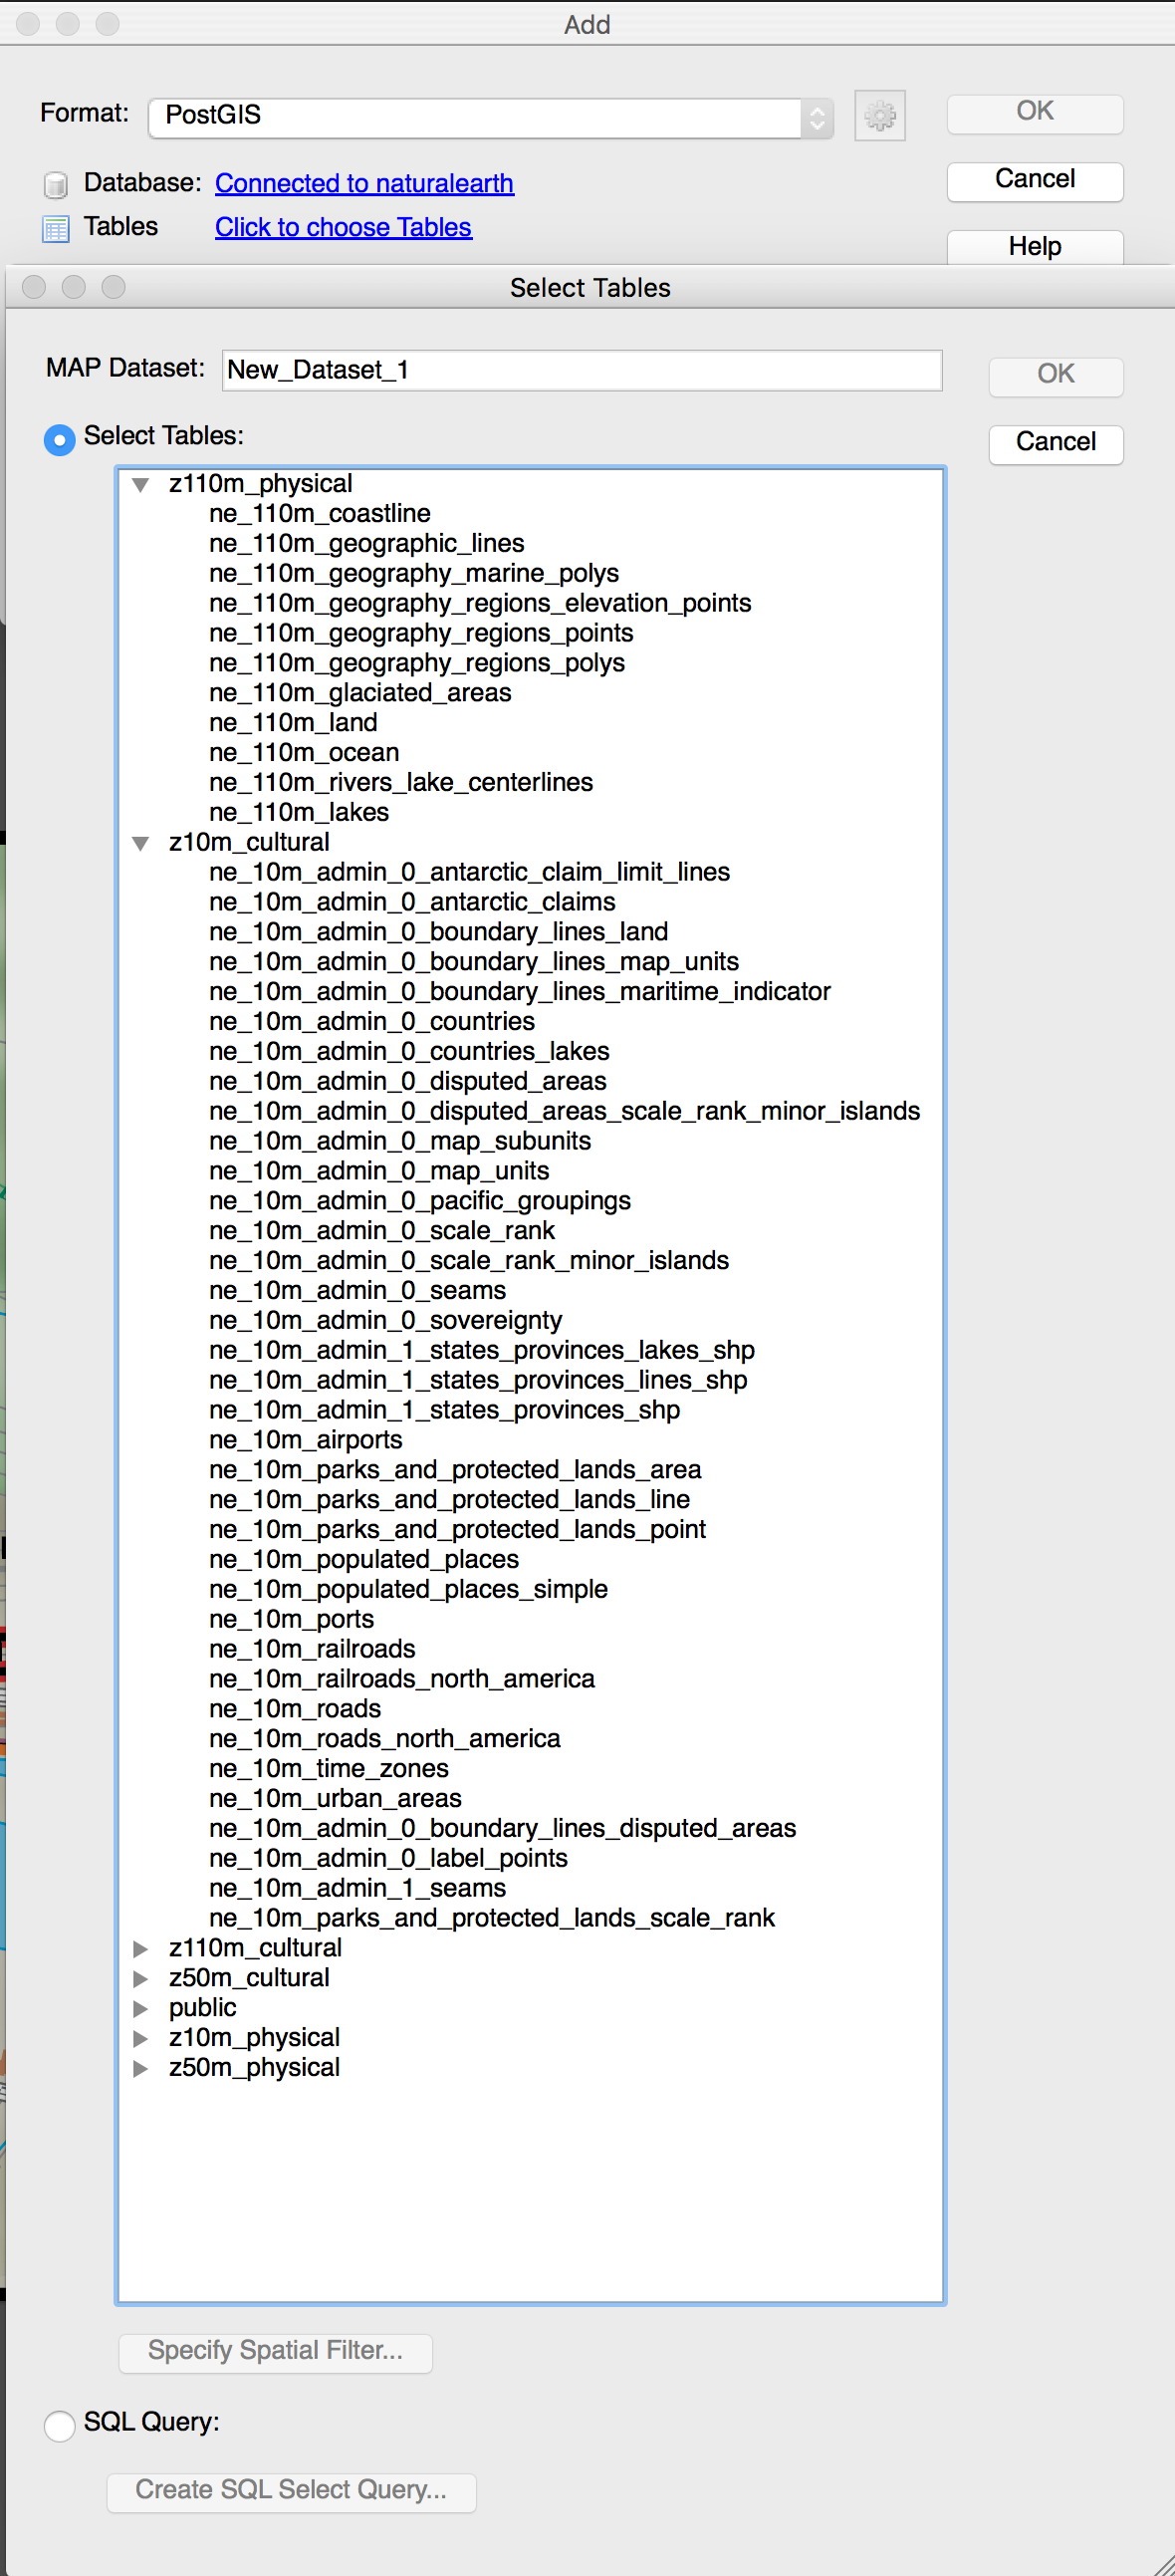
The best part is now you can be working on a map of any area in the world and have quick access to the entire Natural Earth vector data. Import any or all of the themes you want in a single go cropped and reprojected to your area of interest. Just make sure to use the spatial filter to limit the imported features to your specific map area:
- Once you’ve done all this, you should be able to access this database via Illustrator/MAPublisher. From Illustrator go Advanced Data Import>Add…>PostGIS>New Connection>and enter your connection details:
- Install QGIS.
-