Propex HS2000 thermostat: temperature setting chart

I just installed a Propex HS2000 heater in my truck camper and fired it up for the first time yesterday. The fan noise is a little louder and hi-pitched than I thought it would be, but it seems to sip propane pretty slowly and draws 1.8A @ 12v when running. It’s exciting to have warm air flowing in the camper!

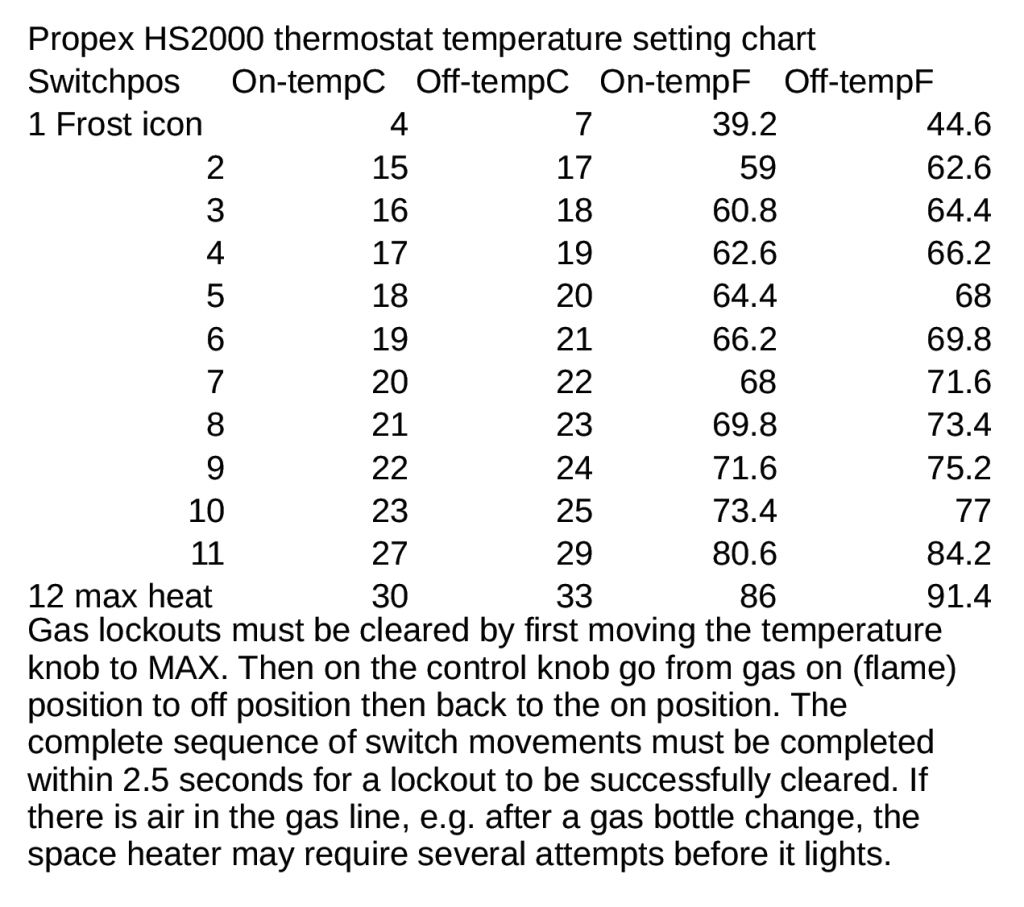
One of my goals for the heater is to be able to keep the camper from freezing while i’m out all day doing an activity in cold weather, but not burn a ton of fuel in the process. Luckily, it looks like the thermostat that comes with the unit has a wide range of settings to allow it to maintain an indoor temp minimum of 39.2 degrees F. (4 degrees C). I’ve mounted a second thermometer with a temperature probe set right at the thermostat in order to see what the comparison is between the two. Here’s the chart for the temperature settings. I’ll report back later after some more use.

Propex HS2000 thermostat temperature setting chart
Switch pos Off-tempC On-tempC Off-tempF On-tempF
1 frost icon 7 4 44.6 39.2
2 17 15 62.6 59
3 18 16 64.4 60.8
4 19 17 66.2 62.6
5 20 18 68 64.4
6 21 19 69.8 66.2
7 22 20 71.6 68
8 23 21 73.4 69.8
9 24 22 75.2 71.6
10 25 23 77 73.4
11 29 27 84.2 80.6
12 max heat 33 30 91.4 86


and a little printable image:

UPDATE 06/2020:

The propex has been running pretty well. I have trouble sleeping with it when it kicks on and off in the night, but I’ve resorted to just more covers at night and then reach out of bed to switch it on in the really chilly morning hours. Overall its been really nice. I wish the fans were not as high-pitched. I also had a gas lockout once and was out of cell service, and didn’t have the manual so I didn’t know how to clear the lockout.  I have the propex hooked up though a normal regulator to a 4-way splitter that then servers a gas stove, the propex, and a quick-disconnect line to the outside. When the stove kicks on sometimes the propex will switch the gas off (green light goes off), but then typically resumes once the gas pressure evens out (I think). Not a big issue, but it’s important to know how to clear a gas lockout state. I’ve appended the lockout clearing info to the printable temp setting image:


Illustrator Character Style Batch Text Regex Replace Script

Disclaimer: This script is really niche, but has come in handy when dealing with lots of text objects that contain labels driven by multiple attribute fields. Ok, into the weeds:

1. Labeling with multiple attribute fields. Sometimes I’ll need to label a set of hundreds of points with multiple attribute fields. MAPublisher can do this easily enough, but I often don’t want them to be broken up into separate text objects. Aligning and moving them around accurately can be quite a chore. Luckily, it’s easy enough to concatenate attributes together into a new field and then label the points with that field. Other text can be added in as well. For example, to concatenate The Name field and Population field together into a newly created citypoplbl field, along with some other text (more on this later), we could do the following:

(Name)& "$Pop.$" &(Population)

to get:

Now we can use MAPublisher to label with the citypoplbl field:

2. Batch mode? This example with only three points would be simple enough to manually adjust character styles to each bit of text that we want–but what if this was a map with 2,000 labels? The tedium would be untenable, and i’d likely revert to separate point text objects for each attribute so they could be styled individually, but then I’d be dealing with alignment issues.. So, what if there was a way to target parts of the point text object string and apply a character style to just that part? Well, dear map nerd, your script has arrived. Read on!

3. Using the Batch Regex Character Style replace script. Once you get the apply_Style_With_RegExp.jsx script from the git repo, put it in a location that is accessible, or in the .../Scripts/ folder of your illustrator installation. Make some Character styles that you want to use:

Select the text objects that you want to target with the script and run it. You’ll be prompted for a regular expression to search with, and a dropdown list of the document Character Styles to apply one to the text found with the regex pattern. This will work with any regular expression, but to make this easy to target, we’ve put ‘$’ into our label string so we can easily target each part of the label string.

Regular expressions are so powerful. I find them totally infuriating sometimes, but when they work, they can save you heaps of time with data processing and now with styling maps as well. regex101.com is an invaluable tool for testing and learning regular expressions.

So, first we want to style all of the city names with the City Name Character Style. We’ll use ‘^’ to search from the start of the string, ‘\w’ to look for any word character, and then ‘*’ to find as many word characters as we can. Since we have a non-word character, ‘$’, after the City Name, the search will find all of the city names and nothing else:

We see that we’ve applied the ‘City Name’ character style to those parts of the string:

Now to style the ‘Pop.’ bit. We could use a really fancy regular expression to find all characters between ‘$’ and ‘$’, but since we know they are all ‘Pop.’ in this case, we can just search for that:

success!

Now for the population value. This regular expression is pretty ugly and I’m sure it could be done more efficiently, but it works. In hindsight, using ‘$’ for the ‘catch’ character is not ideal because it also means ‘end of string’ in regex.

\.\$(.*)$
\. #literally match a period
\$ #literally match a dollar sign symbol
(.*) # '.*' #any number of any characters # '()' used to make this the pattern to actually match
$ #target the end of the string

And now we’ve got all three parts of the label styled with our three separate character styles:

4. Replace the dollar signs. Finally, use the standard Illustrator Find and Replace tool to replace the ‘$’ symbols with normal spaces:


Map on! Once again, many thanks to the talented and generous @shspage_en for working on this script with me.

TLDR and scrolled to the bottom–link to the script

BetterTouchTool for MacOS saves me hours every week

For many years now, I’ve used BettertouchTool in order to have ‘Windows 7-like’ window management on my Mac. With dual monitors and the need to see multiple windows at the same time, it has proven an invaluable tool. I simply can’t even work on a computer without BetterTouchTool now that I’m used to using it. The most common configurations are Illustrator on one full monitor, Illustrator toolbars and panels on 1/2 of the other screen, a terminal in 1/4 of that screen and a browser/text editor in another 1/4. BetterTouchTool makes managing all of this possible:

BetterTouchTool allows you to set up easy shortcuts to ‘throw’ windows between monitors, quickly scale them to 1/2 or 1/4 of the screen, and choose which side of the monitor to inhabit. It makes moving windows around just about perfect and doesn’t break the flow of your work to manipulate a window size. I highly recommend it!


I also use lots of keyboard shortcuts to quickly access custom scripts and menu items in Adobe Illustrator. Through MacOS 10.11.6, an app called Spark allowed me to manage the keyboard shortcuts, but it is no longer in development and doesn’t work in new versions of MacOS. BetterTouchTool comes to the rescue and now does double duty: Fantastic window management and the ability to set up application-specific keyboard shortcuts. For more info on these scripts and getting them set up with keyboard shortcuts in BetterTouchTool, check out my git repo.

Text Selection Wizard for Illustrator

As a Print Cartographer, I use Adobe Illustrator for a huge part of my work. I find myself feeling very limited by the native functionality to select and manage the huge amounts of complex text that I have on my maps. To solve this, I’ve worked with the amazingly talented Hiroyiki Sato, @shspage_en, to create a text selection wizard that makes my work so much easier and productive. Some of the features are shown below:

  1. Select point and path text with a given font size or a range of font sizes. Leave the second box blank if you don’t want to select a range. Optionally choose to change the text objects that are found to a new font size:
  2. Option: ‘Do not select found objects when replacing size’ I’ve used this script on giant maps with ~7,000 text objects. Since this is javascript and not native C, it can take a long time to process all of the objects, but this script perseveres and does the job! Use this option to make the script work less and not re-select all of the objects after it has modified the size.
  3. Select point and path text objects by Font Family and/or Font Style. This is an amazing way to modify the text objects on your map to a new font family or style. Have you ever made a whole map with all of the creek labels being the ‘Light Italic’ font style and wanted to see what it would like with all of the text objects being ‘Italic’ instead? I find that this is not easy because the objects I want to change are mixed with other styles in the layer, so it becomes cumbersome to filter them. Use this script to make that happen without having to tediously select them individually or separate them out into their own layer. Leave the second box empty if you want to select an entire font family and not a specific style.

Give this script a shot along with many other useful scripts for cartography in Illustrator at my git repo.


Loading Natural Earth data into PostGIS for Illustrator/MAPublisher

Natural Earth Data

The Natural Earth datasets are an incredible resource. If you’re a cartographer you probably already know about it, and if not, you should definitely check it out. It’s a project spearheaded by some fantastic folks affiliated with NACIS. NACIS is a great organization that does so much for the cartographic community–check them out! I use Natural Earth Data a lot so it made sense for me to get all of the data into a format where I could import/crop any dataset into my Illustrator/MAPublisher document without having to even touch a GIS. update: Version 4 just got released on 10.30.2017 and it’s better than ever!

MAPublisher Data Import Spatial Filters

One of the things that I’ve come to really appreciate when making maps with Illustrator/MAPublisher is the ability to import and crop data from a large dataset automatically via the MAPublisher advanced data import spatial filters. Being able to import data directly into your map document from large datasets (like OSM, NHD, GNIS, NaturalEarthData, etc.) without having to worry about clipping data and futzing with different CRS’s in QGIS is really nice. Prior to MAPublisher 9.8.1, the only data type that supported the spatial filters was File Geodatabase. This is fine if you have ESRI products, but I use GDAL/QGIS, and support for file geodatabases, both with the OpenFileGDB driver or the ESRI FileGDB driver, is sketchy at best. The OpenfileGDB driver is read-only and using the ESRI FileGDB driver seems to crash QGIS a lot–especially in an active edit session on a file geodatabase.. BUT, as of MAPublisher 9.8.1, imports from PostGIS with spatial filters is supported. This is fantastic because PostGIS is well supported with OSS and is extremely scalable.

So, now to get all of that nice data into a PostGIS database. This will explain the procedure I followed to import the entire suite of Natural Earth vector datasets into a single PostGIS database.

      1. Install QGIS.
        1. After downloading and opening the .dmg, you’ll get a volume with Qgis and some dependencies, including GDAL. Install all of them (1-4) in order. If you get an error saying that it can’t be installed because it’s unverified, enable the installation of apps from Anywhere in System Preferences>Security and Privacy.
      2. Setup GDAL utilities for the command line
        1. Open up a new terminal window (Applications>Utilities>Terminal.app) or use spotlight, my favorite tool: (cmd+space>type “ter”>Enter).
        2. Run the following three commands:
          • echo 'export PATH=/Library/Frameworks/GDAL.framework/Programs:$PATH' >> ~/.bash_profile
          • source ~/.bash_profile
          • gdalinfo --version
        3. You should see the GDAL version returned (2.1.2 in my case). Now you can use GDAL utilities from the command line, and since that line was added to your .bash_profile file, they will be available every time you start your computer.
      3. Install Postgres.app
        1. Download the .dmg and run it. Drag the elephant to the Applications folder, start up the app, and click “initialize”. That was easy! Now you have postgres (and PostGIS) installed. The server should be running look something like  this: 
      4. Download the NaturalEarth full vector dataset.
        1. On the download page, look for the link for ‘Download all vector these as SHP/GeoDB’

        2. Once you download and extract the .zip file, you should see bunch of folders. Six containing all of the themes broken up by category:

      5. cd over to the data.
        1. Fire up a terminal and ‘cd’, or change directory, over to your downloaded data. mine is in my ‘data’ folder in my home directory:
        2. cd ~/data/_Generic/NaturalEarth/natural_earth_vector
        3. pwd can be used to echo out your current location, and ls -lah will list the current folder with all the deets:

      6. Setup the PostGIS database.
        1. Fire up a psql window by clicking on the elephant in your menu bar>Open Postgres>double-click on any of the default databases:
        2. At the psql prompt, run the following to setup a new database with PostGIS and some schemas to organize the data with.
          CREATE DATABASE naturalearth;
          \c naturalearth
          CREATE EXTENSION postgis;
          CREATE SCHEMA z10m_cultural;
          CREATE SCHEMA z10m_physical;
          CREATE SCHEMA z50m_cultural;
          CREATE SCHEMA z50m_physical;
          CREATE SCHEMA z110m_cultural;
          CREATE SCHEMA z110m_physical;
          CREATE EXTENSION hstore;
        3. Setup DB search paths. This will allow MAPublisher to be able to index the extra schemas for use with the data import spatial filters.
          ALTER DATABASE naturalearth SET search_path = z10m_physical, z10m_cultural, z50m_cultural, z50m_physical, z110m_cultural, z110m_physical, public;
        4. That should be it. The database is all ready for the ogr2ogr imports.


      7. Import all .shp’s into PostGIS
        1. In a terminal (not the psql one) ‘cd’ over to your shapefiles:
        2. cd ~/data/_Generic/NaturalEarth/natural_earth_vector

          List the directory to see what we’ve got. you should see folders for the 6 main categories:

        3. now, cd into the first one, ’10m_cultural’
          cd 10m_cultural/
        4. Run the ogr2ogr import for all .shp’s in this theme:
          for f in *.shp; do PGCLIENTENCODING=LATIN1 ogr2ogr -update -append -progress -skipfailures -nlt GEOMETRY -lco GEOMETRY_NAME=geom -lco SCHEMA=z10m_cultural -lco PRECISION=NO -f "PostgreSQL" PG:"dbname=naturalearth user=username" $f; done;
        5. So, what are we actually doing here:
          for f in *.shp; do #search the folder for all files with .shp extension and do all the rest of this business to them.
          PGCLIENTENCODING=LATIN1 #set the encoding to play nice with some of the feature names with special characters. it's still not perfect.
          ogr2ogr #invoke GDAL/OGR. gdal for raster, ogr2ogr for vector.
          -update -append #append the data to an existing table if preset, not overwrite.
          -progress -skipfailures #show a progress bar. if there are problems, keep truckin.
          -nlt GEOMETRY

          #nlt=new layer type. typically this wouldn’t be necessary as the geometry type would be automatically detected. However, these shapefiles have mixed polyline/multipolyline and polygon/multipolygon geometries in the same .shp. PostGIS will default to “promote-to-multi”, which is usually preferred, but this will result in Illustrator/MAPublisher importing even simple lines and ‘single-ring’ polygons as compound paths. This is annoying when you later need ot break the paths, run join tools on them, etc. SO..specifying “GEOMETRY” will retain the single/multi designation of each feature as it is in the .shp and will be imported correctly into Illustrator/MAPublisher. If you were going to do a bunch of geoprocessing or analysis on this data, this would be no bueno, but since all we’re doing is importing into Illustrator, this is preferred.

          -lco GEOMETRY_NAME=geom

          #lco=layer creation option. Set the name of the geometry column to ‘geom’. This isn’t usually necessary either, but some versions of MAPublisher have the spatial filters hard coded to only detect the geometry properly if ‘geom’ is the name of the column containing the actual geometry.

          -lco SCHEMA=z10m_cultural

          #import all of these .shp’s into this schema. This is important to set correctly based on the name of the folder of shapefiles you are in. z10m_cultural in this case. You’ll change this for all six categories of the Natural Earth Data. the ‘z’ is simply because a schema cannot start with a number.

          -lco PRECISION=NO

          #some of the .shp’s have rounding errors on the fields when importing into PostGIS. Use this to make sure that even features which have these long rounding errors get imported too.

          -f "PostgreSQL" PG:"dbname=naturalearth user=username"

          #this is the data format that ogr2ogr is writing TO. PostGIS in this case. the dbname, and the username you setup. If you have Postgres running on a port other than 5432 or have a password setup, you’ll need to specify that here too.

          $f; done;

          #$f is each shapefile as the ‘for’ command loops through the folder, done; is to the way to end the loop.

      8. Results. After running the command you should see a bunch of progress bars and no errors:
      9. Run for the 5 other categories.
        1. After running that command for one of the folders, ‘cd’ back a directory (../) and then into another one of the directories, and run the command again. paying close attention to modify the schema to match the folder that you are in.
          cd ../10m_physical
          for f in *.shp; do PGCLIENTENCODING=LATIN1 ogr2ogr -update -append -progress -skipfailures -nlt GEOMETRY -lco GEOMETRY_NAME=geom -lco SCHEMA=z10m_physical -lco PRECISION=NO -f "PostgreSQL" PG:"dbname=naturalearth user=username" $f; done;

      10. Clean up the database
        1. Once you’ve done this for all six folders, switch back to your psql terminal and run a vacuum on the database. this will clean up all of the transactions:
          VACUUM FULL;

      11. Import at will!
        1. Once you’ve done all this, you should be able to access this database via Illustrator/MAPublisher. From Illustrator go Advanced Data Import>Add…>PostGIS>New Connection>and enter your connection details:

          Once connected to the database, you should see all of the tables organized in the schemas you setup:

          The best part is now you can be working on a map of any area in the world and have quick access to the entire Natural Earth vector data. Import any or all of the themes you want in a single go cropped and reprojected to your area of interest. Just make sure to use the spatial filter to limit the imported features to your specific map area:


Switch between two versions of GDAL on a Mac

I’m a big fan of Qgis and use it all the time. It’s gotten so stable and fast. It is such a joy to use now! On one of the recent versions that I upgraded to it went from using GDAL 1.11.x to using 2.1.x. This is great, but sometimes I need to be able to write to File Geodatabases. The FileGDB driver and the ESRI FileGDB API SDK that I installed for GDAL 1.11.x no longer works under GDAL 2.1, and as far as I can tell, there is no ESRI FileGDB API SDK that is compatible with GDAL 2.1.x.

So, GDAL 1.11.x is still installed on my machine with the FileGDB drivers, but how can I switch back and forth between 2.1 and 1.11 so that I can still use GDAL 2.1.x with QGIS, but be able to use GDAL 1.11.x on the occasions that I have to deal with file geodatabases? Luckily, there is a simple symlink that points to the current version and re-pointing the symlink is all we need to do.

So, here we go:

First, add GDAL to your PATH variable so you can use GDAL/OGR commands
in a terminal window. (skip this if you already use GDAL from the command line).

echo 'export PATH=/Library/Frameworks/GDAL.framework/Programs:$PATH' >>~/.bash_profile

source ~/.bash_profile

#cd over to the GDAL Framework ‘Versions’ directory

cd /Library/Frameworks/GDAL.framework/Versions/

#list the folder to see the installed versions and the ‘Current’ symlink.

ls -lah

you should see something like this, with the ‘Current’ Symlink pointing at version 2.1:

 #check the current GDAL/OGR version:

gdalinfo --version

 should be 2.1.x, the same as the symlink.

#just for kicks, show that we don’t have access to the ESRI FileGDB driver with 2.1.x:

ogrinfo --formats | grep "FileGDB"

 as expected, we only have the OpenFileGDB driver.

Ok, now let’s make the switch.

#unlink, and then re-point the symlink at the older version of GDAL:

unlink Current && ln -s 1.11 /Library/Frameworks/GDAL.framework/Versions/Current

#and list the folder again to show the modified symlink:

ls -lah

now your active GDAL version has changed to the older version. 1.11 in this case.

#check your GDAL version, it should be the older one now:

gdalinfo --version

#check the available formats, this should show the ESRI FileGDB drivers (if you’ve installed them):

ogrinfo --formats | grep "FileGDB"

Now you can use GDAL as normal. Your newer installation of QGIS might not work properly with this older version of GDAL, so just use it from the command line. Once you’re done messing with your file geodatabases, re-point the symlink back to GDAL 2.1.x:

#re-point the symlink back to GDAL 2.1.x:

unlink Current && ln -s 2.1 /Library/Frameworks/GDAL.framework/Versions/Current

#and check the version, which should be switched back to 2.1.x:

gdalinfo --version

Replacing text shields with symbols in MAPublisher LabelPro

Replace text glyph shields with your own Illustrator symbols en-masse! What is this magic? We’ll use a custom shields file, a selection trick, and a script to make it happen. If this is interesting to you, read on..

When I make maps with Avenza MAPublisher, one of the common things that I need to do is place shield labels on roads. This is possible with an extra extension to the base MAPublisher license called MAP LabelPro. It’s worth noting that this requires an additional up-front cost and annual maintenance fee.

In the MAP LabelPro setup dialogue, you can choose from sets of pre-built shields to use:

These are nice to have but have some limitations. They are actually generated from a bundled .ttf font file, and the shield objects themselves are hard to deal with because of this. Note the shield underlined like a text object and the Label-EZSymbols font associated with it:

I need a lot more control over the style of the shields (as I expect most cartographers do), so the options are to: (1) make your own custom ‘shields’ .ttf font files (export your .ai shield art to .svg and turn it into a .ttf file) or (2) find a way to replace the ones that are placed with MAP LabelPro with your own normal .ai shield symbols. I attempted option 1, but it turned into a ton of fiddly conversion work, time wasted, and the end product was still a text object that I didn’t really want in the first place. So, option 2 is what we’ll work out below.

  1. Make a custom .lsf file for your shields. Navigate to your MAPublisher prefs (Illustrator>MAPublisher Preferences). Click on MAP LabelPro and see where your rules, styles, and symbols are at. By default this is set to:
    /Applications/Avenza/MAPublisher 9.9/MAPublisher Plug-in/LabelPro/Symbols/ I highly recommend setting this in a custom location on your disk. Then you can keep track of everything, make it a git repo if you want to, and not lose it all when upgrading MAPublisher versions.

    Make a copy of the .lsf file that best matches your use case. I make print maps, so ‘generic_shields_cmyk.lsf’ will work for me.
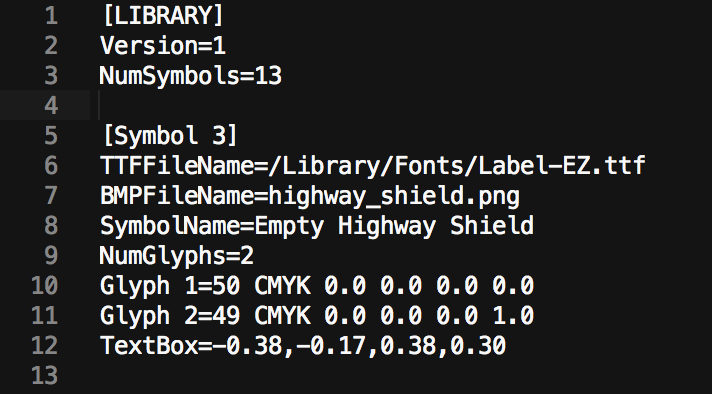
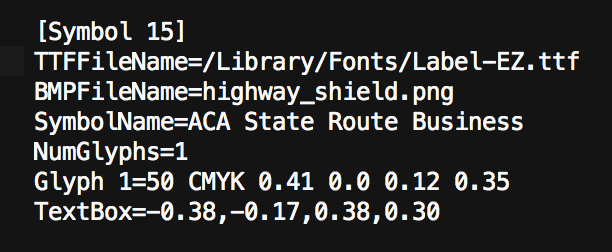
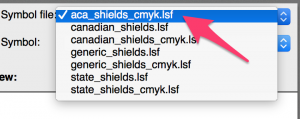
Name it something that you will recognize. I’ll name mine ‘aca_shields_cmyk.lsf’

  2. Edit the .lsf file with custom shields.  Crack open your new .lsf file in your favorite text editor. This file describes the properties of each symbol. Let’s look at one below:

    1. The first three lines are the header info. Leave everything as-is. The only thing to take into account here is that as you build your .lsf file with different symbol sets, you need to set NumSymbols=XX to the number of symbols in your file.
    2. Each block of code after that represents the properties of a single shield. For the example above:
      1. Line 5: the number of the symbol in the file. sequential from top to bottom.
      2. Line 6: the link to the .ttf file with the shield text objects. leave this alone.
      3. Line 7: the link to the shield .png file. this is just the display icon in the MAP Label Pro dialogue. leave this alone.
      4. Line 8: the name of the shield that will appear in the labelPro dialogue
      5. Line 9: The number of glyphs that make up the shield. it’s important that this matches the glyph defs coming next
      6. Line 10-11: the glyph ids coming from the .ttf file in windows 1251 character encoding (ie-“1=50”) followed by C,M,Y,K values for the glyph
      7. Line 12: the alignment of the text on top of the shield. (left,bottom,top,right)
      8. That is kind of a mess, but not to worry, we are going to keep it simple. Remember that these text shields are just a method to get objects into our illustrator document. we’re going to replace them with our own illustrator symbols. All we really care about is the SymbolName, NumGlyphs, and CMYK value.So, copy one of those blocks and edit it:

        1. Set Your SymbolName to represent one of you .ai shield symbols, ‘State Route Business’ in this case.
        2. Set the NumGlyphs to 1. this is important because we want to keep the replacement simple and a single glyph is easy to target.
        3. Set Glyph to “1=50 CMYK *CMYK values*”. This example represents a grayish blue 41,0,12,35. We’ll use this color to represent all shields on our map that we want to use our State Highway Business Route shield for. Yours will likely be different. This is important because we will use this color as a target later on during the replacement. I’m not sure why there is a leading ‘0.” in front of the CMYK value–just roll with it.

        4. You’ll repeat this process for each shield that you want to be able to place with LabelPro and then replace with one of your own symbols. Remember to number the symbol entries sequentially, and then edit the header with the number of symbol entries that you have in the file.
    3. Setup LabelPro with your shields. Open up a MAPublisher document with some road data that you want to label with. In a perfect world (haha) you’ll have an attribute representing the shield type (State/Federal/County, etc) and another with the number of the route. Click the LabelPro button, add your line layers, setup your attributes and sql, and then in the “Label With Symbol” section:
      1. You should see your new .lsf file represented:

      2. And all of the shield entries that you made in the file:

    4. Label! Run your LabelPro rules and check out your output. Remember that the goal here is to have a shield placed with a single glyph, with a fill color representing a certain class of shield that we want to replace with our own shields. For example, below I’ve used this green color to represent a shield class of “I” (interstate), and a value that is 2 digits long:

      I’ve used this blue color to represent a “MT” (or any State Route), and a value is 3 digits long:

    5. Setup Replacement Key. Now you have a map full of strangely colored shields. Make a new layer that will serve as the replacement ‘key’. This will be something that you want to keep around to copy/paste into new documents or integrate into your template files. It should contain an instance of the text symbol (from your recently placed shields) and the corresponding illustrator symbol. Mine looks like this. It’s grouped by route type and the number of digits in the label string:

    6. Download and install find/replace script. The great and generous cartographer, Nathaniel Kelso, wrote some illustrator scripts way back in the day and graciously shared them with the world. We’ll use one of them to do this replacement. Download his scripts git repo here. The one we’re interested in is the “findAndReplaceGraphic_centered.jsx” file. Install this file (or all of them) into your Scripts Folder. This is something like: “/Applications/Adobe Illustrator CS6/Presets.localized/en_US/Scripts” Yours might vary slightly. Once it is there, it should be available in your File>Scripts menu.
    7. Do the Replacement Already! Ok, finally, let’s do this. You will have a MAP Text Layer containing all of the text shields that were placed by LabelPro. Drag the layer that represents your replacement key in a layer above the shield layer. It’s ok that the text is grouped with the shield object–This script is smart enough to work through the groups. It should look something like this:

      Direct-Select one of the shields in your replacement template layer. The key here is to select only the text symbol object (and the corresponding fill color). With that selected, Go: Select>Same>Fill Color:

      All of the shields across the map with that fill color (and road designation) should be selected. It doesn’t matter if they are in multiple layers or MAP Text suppression layers:

    8. Now, Shift+click (to add to the current selection) the illustrator symbol that represents the class of shields you currently have selected. This symbol should be ABOVE the text symbol instances in the Replacement template layer. Go: File>Scripts>findandReplaceGraphic_centered

    9. Done! The script may chug a little bit, but just give it time. I’ve used it on huge maps with hundreds of replacements and it always works if you just let it be. If you look at the shield objects in the layer list, you’ll see that the illustrator symbol has replaced the text symbol inside the group with the text string:

      Repeat for all the other shield colors/classes, and you should have a map with your own illustrator symbols ready to work with: